

I love Basepaint, and am always seeking ways to elevate the art & the community. I built this Baseprite plugin (based on a simpler version originally gifted to me by Zherring) & I am releasing it for free, because I want everybody in the community to be able to tap into the magic of Aseprite for their Basepaint creations!!
👉 Download Link / Github Repository
This project is CC0, feel free to build on this!
Step 1. Download the baseprite.lua file, then drag it into you Aseprite “Scripts” folder.
(In Aseprite, go to File > Scripts > Open Scripts Folder)
Rescan your scripts folder, then you should see “Baseprite” as an option!
Note: Please be sure to use Aseprite version 1.3.5 or more recent.
Step 2. New File, let’s get started! We’ll make a new sprite at 256x256px (the size of a Basepaint canvas!)
(Tip: Right Click > Copy Image on the canvas directly from the gallery)
Now it’s time to open Baseprite! File > Scripts > Baseprite
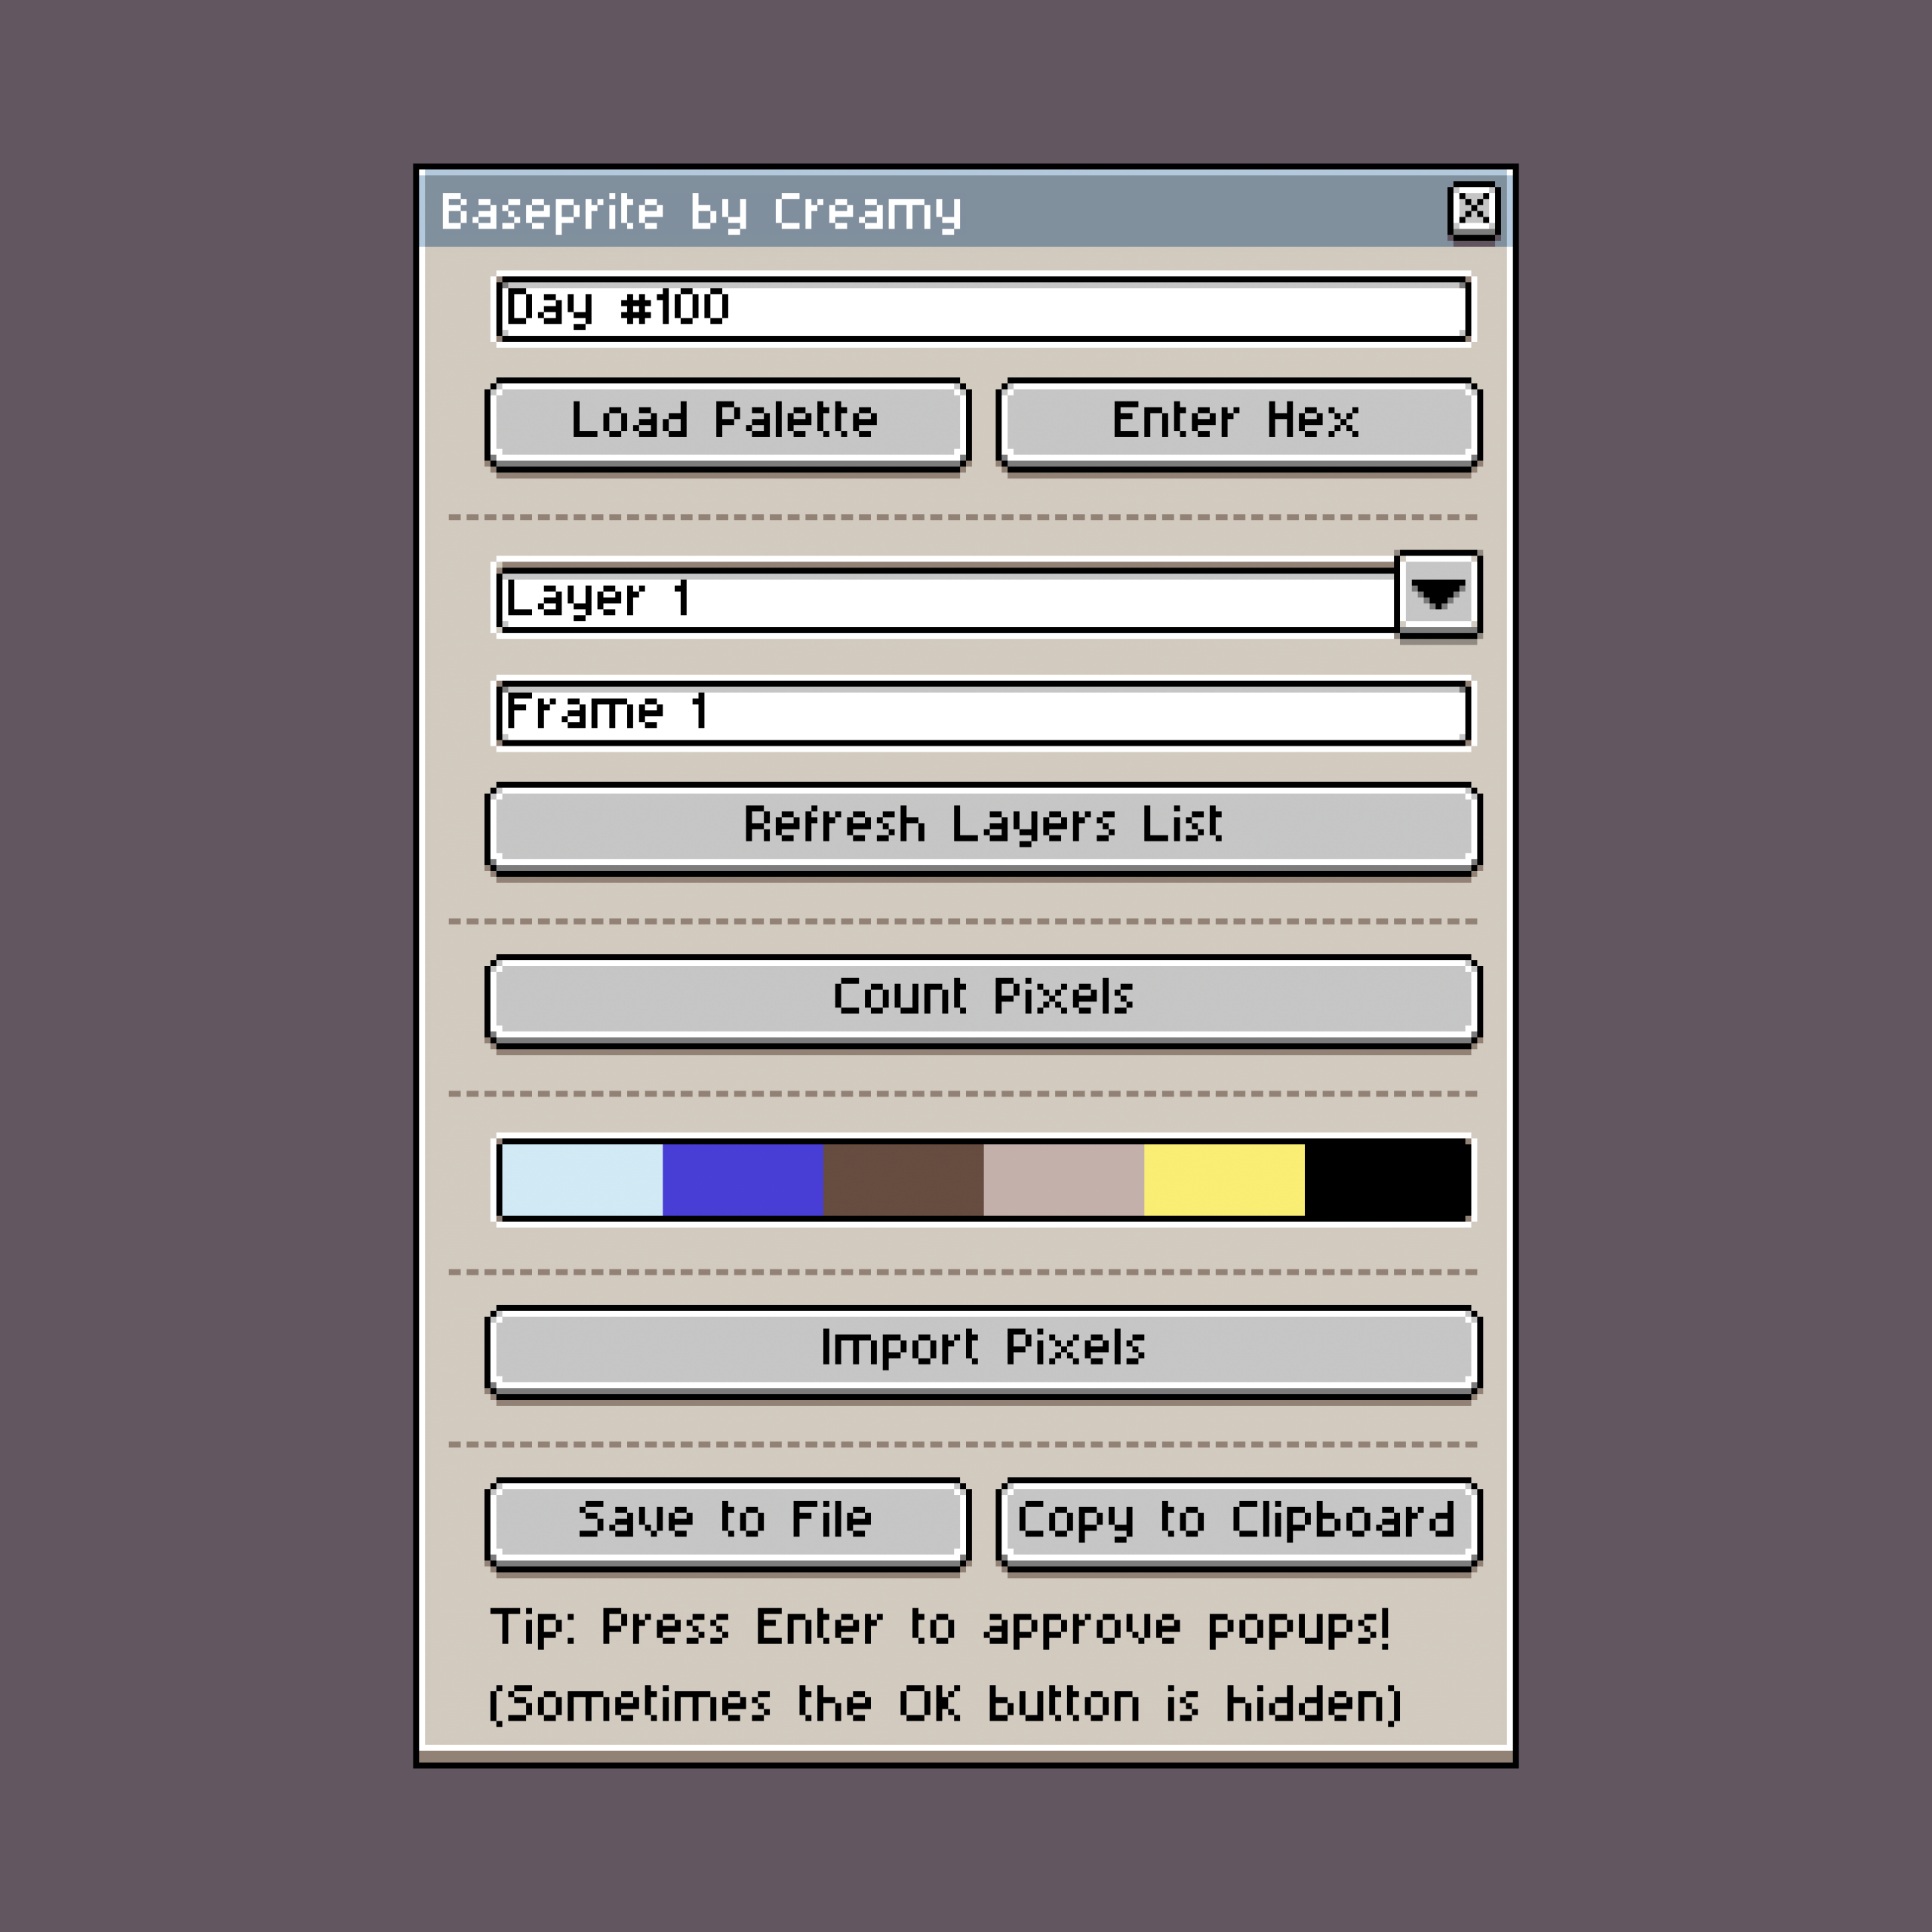
Let us take a moment to appreciate all the different buttons & inputs!
Day # – Enter a Basepaint day number here! (can be: “100”, “Day #100”, or even try “random”!)
Load Palette – Loads the Basepaint palette from the input Day #.
Enter Hex – Allows you to input hex codes manually, if you would rather set the palette that way.
Layer Menu – The layers dropdown menu, selects which layer will be saved/copied.
Frame Input – Type in which Frame # you are targeting for export.
Refresh Layers List – Click this whenever you add new layers, to refresh the layer menu.
Count Pixels – Counts the amount of pixels for the selected layer & frame!
(You can enter “all” in the frames input, then click “Count Pixels” to count for all frames!)
Palette – View the active color palette! Click on a swatch to select the color.
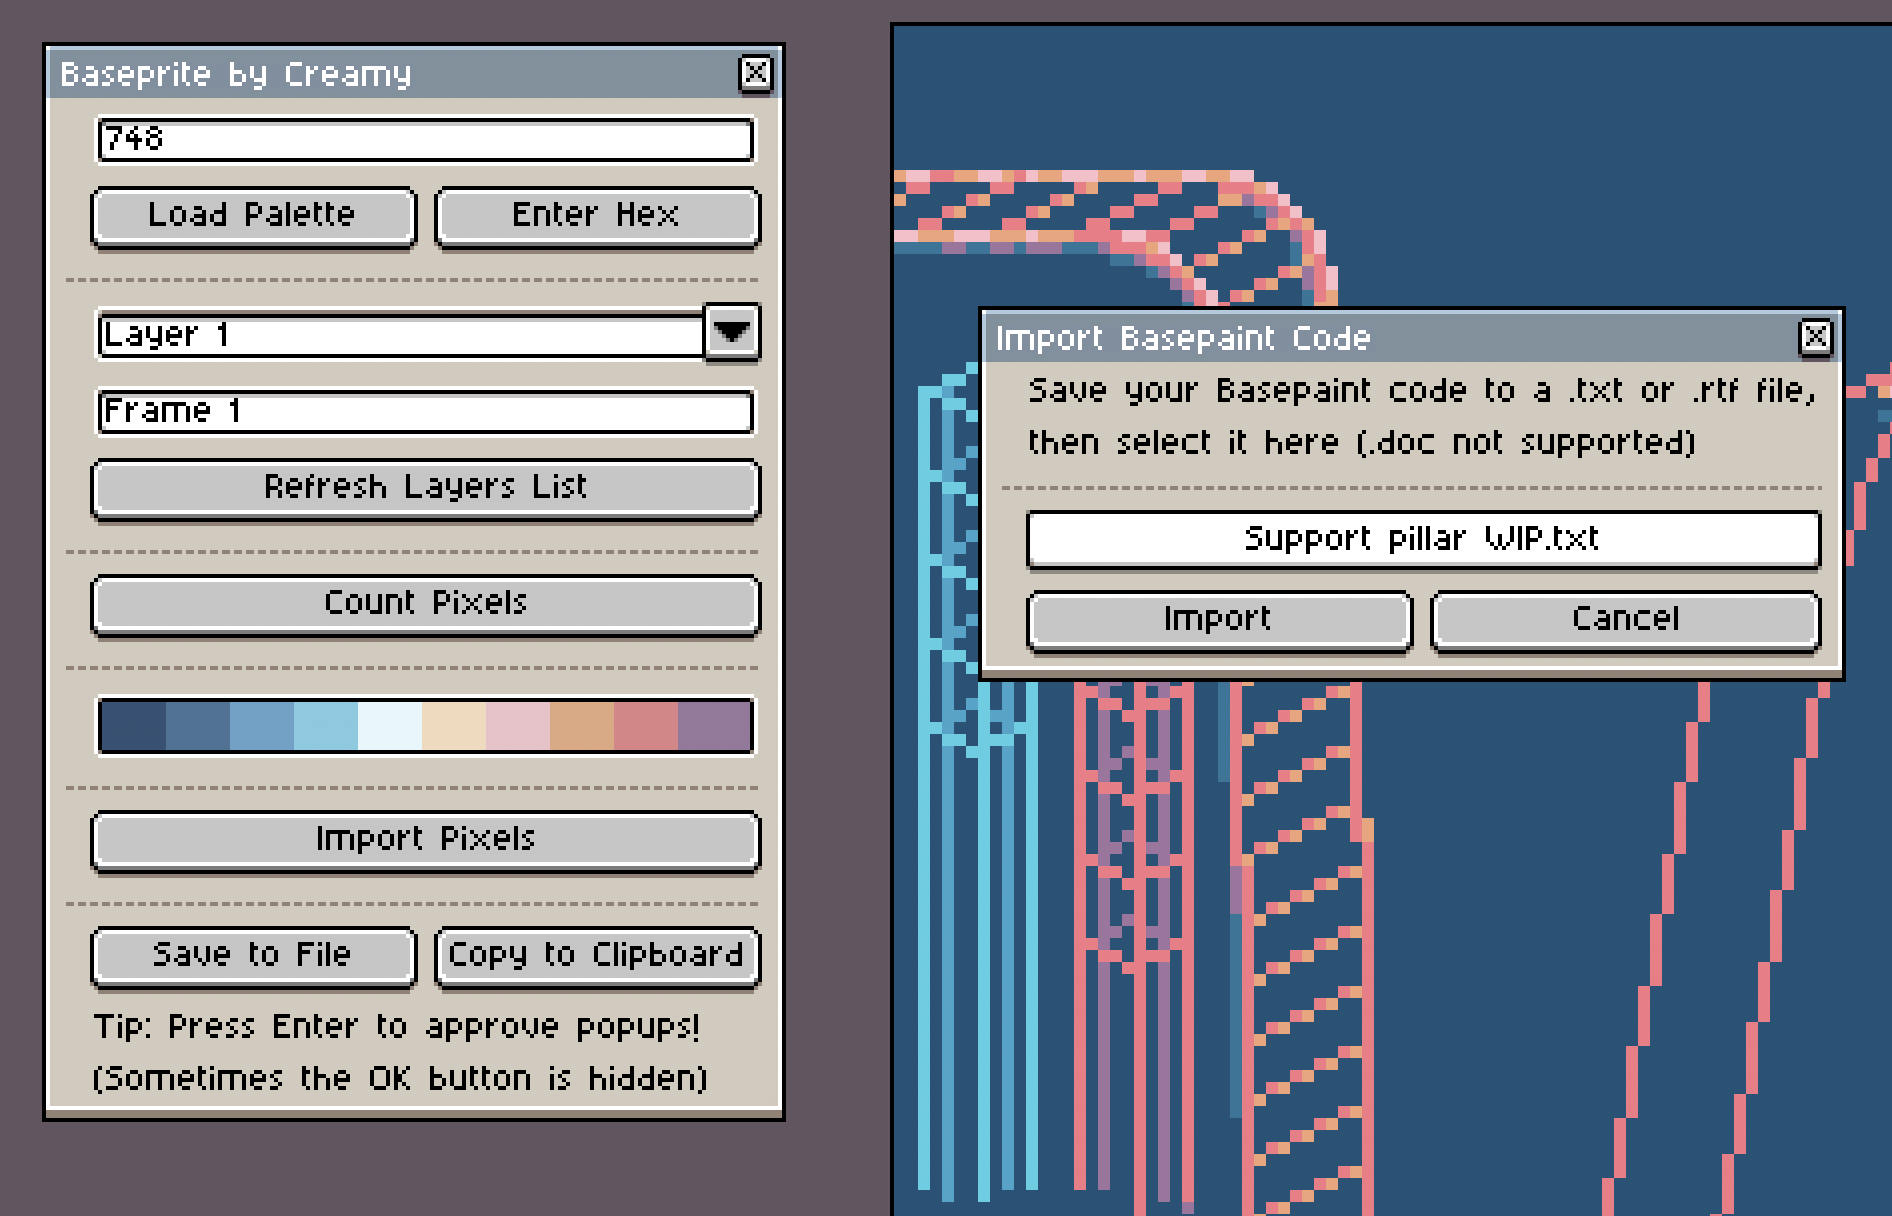
Import Pixels – Click here to import pixel code, from a plain text (like .txt) or .rtf document (.doc not supported).
Save to File – Prompts you to save a .txt file containing the pixel data. Be sure to set a filename & location.
(Once saved, the plugin will attempt to automatically open the file in a plain text editor)
Copy to Clipboard – Copies the pixel data to your clipboard, ready for immediate paste into Basepaint!
(Note: Press enter to approve the dialogue popups, the OK button will most likely be hidden since the pixel data is ginormous)
Step 3. It is time to load our palette! Input the correct “Day #” then simply click “Load Palette” and… walla! (Approve any popups along the way) The script works by downloading the Basepaint API directly from the website, so an internet connection is required for this method to work!
If you would rather input the palette manually, simply click “Enter Hex“. This will bring up a new dialogue window that prompts you to “Import Hex Colors”. Enter a string of hex codes like this – #ffffff, #808080, #000000 – then click “Import” and… walla!
Step 4. Baseprite v2 allows you to use Frames in addition to Layers. The layer dropdown menu is unchanged from the previous version. Type in manually which Frame # you would like to export. Be sure you have the correct layer and frame set, before you “Save to File” or “Copy to Clipboard“!
Step 5. When you are ready to export your drawing to Basepaint, you have two options – “Save to File” or “Copy to Clipboard“
Copy to Clipboard is the quickest way to bring your drawing into Basepaint. Push this button, then go to the main Basepaint canvas, make sure the canvas is selected (click on the palette), then Paste!
Save to File is also an option, making it easy to save your pixel data to be shared in chat. Once you click Save to File, click on where it says “output.txt” to set a filename & location for saving. Then you must press save twice, once in the file browser, and again on the “Save Pixel Data As” dialogue. Make sure to allow write access, then allow again for Aseprite to open the file in a plain text editor.
Import Pixels allows you to import pixels from a file of “Basepaint Code” to your current Aseprite canvas! First step, make sure you have the palette set; the code uses color “numbers” and will be mapped to your current file based on the order of your palette. With your palette set, click “Import Pixels” to bring up the Import dialog. Click “Select File” to bring up a file selector, and choose the file with your Basepaint Code. Click “Import” and it should add a new layer with your art!
Do you love Baseprite? Try Palette Hex too – this new script allows you to quickly paste Basepaint palettes into Aseprite!
Thank you for using this plugin! & Cheers to 1000 more days of Basepaint!
💙🖌️